HOME GARDEN TECHNOLOGY LEAFLET 6
SPECIAL TECHNIQUES FOR IMPROVING SOIL
AND WATER MANAGEMENT
COMPOST
Compost is a soil-like material created from decomposed organic material. Composting is a natural way of recycling plants, and it is easy and inexpensive. All that is needed is time, some space in the garden, access to waste materials that decay easily and water.
Composting takes about three months, depending on the conditions that can be created to facilitate rapid decomposition of organic matter while limiting nutrient loss.
How to make compost
Plants and other organic matter (such as animal manure) are put in a pile over a large surface area. Chopping, shredding or breaking up the material which is put in the pile speeds the action that allows the organic matter to break down into the compost, which is a dark, fine humus-like material. This will later be applied to the soil to improve it.
Any natural materials, including kitchen waste such as fruit and vegetable peelings, wood ash, and plant residue from the home garden and field can be used to make compost. Even weeds can be used, if the weed seeds do not get into the compost. Animal manure and horn and bonemeal are also extremely valuable materials for making good compost.
FIGURE 1
Example of a compost heap

To prevent compost from drying out, the compost heap should be located in a shady place. Waterlogged areas, however, should be avoided. Although compost can be made in a pit, it is better to make the heap on flat ground. Air facilitates the decomposition process and needs to circulate freely around the heap.
A compost heap needs to be built carefully if it is to produce good compost. It is not a rubbish dump. Before making a compost heap, suitable materials must be collected and sorted to remove the large, woody pieces. Compost materials should be placed in layers, with the coarsest materials at the bottom. This allows for good drainage when it rains. Layers of cut-up soft materials are alternated with more fibrous materials. Each layer should be about 15-20 cm thick. Figure 1 shows a cross-section of a compost heap.
A layer of 2-3 cm of soil, as shown in Figure 1, serves as an inoculate by adding microorganisms to the heap.
The compost heap should not be wider or higher than 1 to 1.5 m. The length will depend on the availability of materials. There should be room on both ends of the heap to allow household members to walk. Under dry, hot conditions, the heap should be covered with banana leaves or other suitable materials. Air is essential for the composting process. To allow air to penetrate the heap, place vertical bunches of dry grass or bamboo poles into the heap 1 m apart.
A built-up compost heap will heat up, reaching temperatures as high as 60o to 80°C. This high temperature pasteurizes the compost, killing pathogens. After about 15 days, the temperature of the compost will drop and the heap should be turned over, which means that the bottom layers should be brought to the top.
After about five weeks, the heap must be turned over again. The materials on the outside of the heap should be forked into the middle, the moisture content should be checked and water added if needed. A compost heap should be kept moist (at about 45 to 65 percent humidity) at all times, since moisture is necessary for the fermentation process. Too much water, however, causes compacting and rotting. Covering the heap with banana leaves can help prevent flooding during the rainy season. If it becomes too wet, the compost heap should either be turned or corrected by adding dry materials.
By the end of the third month, the compost should be ready for use. It should be dark brown, crumbly and have an earthy aroma. If the compost still contains materials which are not broken down, it is only partly decomposed. Adding partly decomposed compost to the soil can reduce the amount of nitrogen available for plant growth. Therefore, particles that are not fully decomposed should either be separated out by sieving or left to break down further.
FIGURE 2
Turning over the compost heap
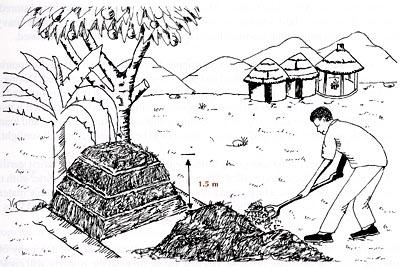
TABLE 1
Guide to more efficient composting
Symptoms |
Problems |
Solutions |
The compost has a bad odour |
Not enough air or too wet |
Turn it. Add dry material if the heap is too wet |
The centre of the heap is dry |
Not enough water |
Moisten and turn the heap |
The compost is damp and warm only in the middle |
Too small |
Collect more material and mix the old ingredients into a new heap |
The heap is damp and sweet-smelling, but will not heat up |
Lack of nitrogen |
Mix in a nitrogen source like fresh manure, or still bloodmeal |
There is still a high proportion of not decomposed material |
Composting period was too short |
Leave the compost heap for some more days. Sieve it and use the finest part |
Using compost and animal manure
Animal manure, like compost, must be well decomposed before use. Fresh manure may burn plants if placed too close to them. Manure should be dried in the shade and stored for later use. Compost is best when it is crumbly like forest litter. It should not be heavy or sticky. Compost and animal manure should both have pleasant smells when used.
Compost and animal manure can be mixed or applied separately. Both release their nutrients slowly and should therefore be applied just before trees and crops are planted. During tree planting, mix compost or manure with part of the subsoil that has been dug out, and then use the mixture to fill the holes around the planted seedlings. A compost trench is useful for nourishing a row of new crops or for feeding established crops. Compost and manure also can be sprinkled on the soil's surface, but should be protected from full sunlight.
Fully rotted compost mixed with sandy soil is ideal for use in a nursery if it is first sterilized so that undesirable bacteria are killed. To sterilize compost, mix one part water with nine parts decayed compost in a large container. Cover the container with suitable material, such as banana leaves, and heat the mixture so that water steams through it and kills any unwanted bacteria. This process takes several hours.
To determine if the compost is adequately sterilized, place a sweet potato or any other tuber on top of the steaming compost. Because the steam from the compost will cook the tuber, compost material can be considered safe when the tuber gets soft. It can then be mixed with soil and used in a plant nursery.
The ratio of soil to compost depends on the fertility of the soil being used, but 10 percent compost is the minimum, 30 percent optimum, and 50 percent maximum in planting shrubs and trees.
For home gardens, spread compost no more than one-third of the tilled depth and mix well with the upper part of the topsoil to avoid losses. When using less decomposed material, add extra nitrogen (such as manure or commercial fertilizer) to ensure that growing plants will not suffer nitrogen deficiency.
GREEN MANURE
Another way to feed the soil is to grow crops that provide green manure and mix them into the soil after cutting them. Incorporate fast-growing crops (especially legume plants) into the soil before they mature to improve soil fertility and organic matter content. As with compost, if plots need to be used before the green manure is fully decomposed, add extra nitrogen so growing plants will not suffer from nitrogen deficiency.
FIGURE 3
Hedgerow use of green manure
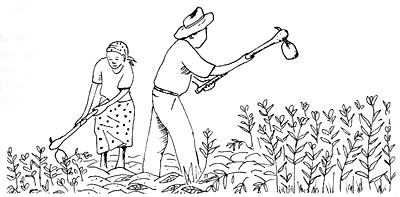
Crops such as velvet bean, pigeon pea, grass pea and lupine are all suitable as green manure crops. All collect nitrogen from the air through their roots and disperse it after decomposition. These plants are either cropped singly or in a mixture with other fast-growing plants, such as guinea grass, hemp and crucifers, to increase the amount of organic material. A number of suitable green manure crops (e.g. Cajanus cajan or Leucaena sp.) can serve several other purposes. They can be grown as hedges or alleys, and provide animal feed, food, firewood and garden stakes (see Figure 3).
For best results, select species according to specific agro-ecological conditions, including climatic and soil characteristics. Main green manure species include:
Low or creeping legume plants can be intercropped or relay-cropped with other food and perennial crops to improve soil conditions and control weeds.
MULCH
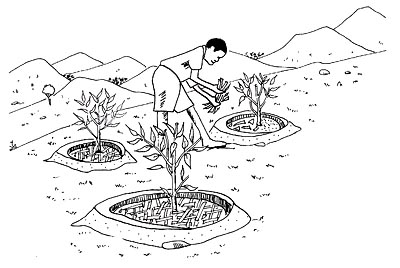
Mulch is a layer of leaves, grass, straw or other organic material that is spread between plants to feed and protect the soil. If properly applied, decaying mulch adds nutrients and protects the soil. It helps reduce soil erosion and weed growth, conserves water, and helps maintain soil moisture. Mulch that is too heavy can sometimes harbour rodents.
Make sure that mulch materials do not contain seeds, which could germinate after the mulch application. On seed beds, mulch should be removed when seedlings emerge. After its removal, however, seedlings must be protected from strong sunlight. To do this, construct a light awning of straw or bamboo, or any other suitable material, and place it above the nursery bed. See also Home Garden Technology Leaflet 16, "Plant propagation and nursery techniques".
FIGURE 4
Mulch
WATER HARVESTING AND CONSERVATION
A basic principle for water harvesting and conservation is to collect water during the rainy season for use in the dry season. During drier periods water saving technologies allow for more efficient water use.
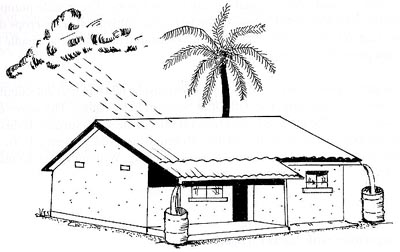
Water can be harvested in containers from rooftops. Household wastewater from washing clothes, dishes or bathing also can be used for home gardening purposes if it does not contain a lot of soap.
FIGURE 5
Water harvesting from the roof
Water can also be harvested from river beds and dry wadis with hand-dug wells and water holes. In some Sahelian countries, night dew is collected with pieces of cloth and the moisture squeezed out over the crops.
Night dew accumulates on rocks or stones and then slowly flows off into the soil. This reduces soil evaporation rates. Many farmers in dry areas are aware of this and thus leave rocks or stones in their fields.
If the community water supply is critically low, small dams, ponds and wells can be constructed. In the Niger, water is traditionally collected in ponds during the rains. When pond water recedes, the same spot can be used to grow leafy vegetables, tomatoes and other vegetables, especially during the long dry season. Technical advice on the appropriateness of a given area for dam construction is essential.
Hand-dug wells are commonly used. Concrete or metal rings lowered into the dug-out wells reinforce well walls. The rings are expensive, but they last as long as 50 years.
MICROIRRIGATION
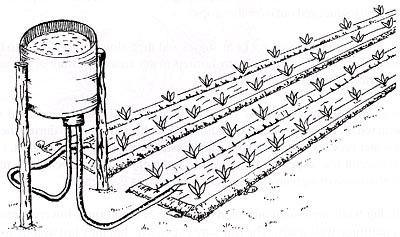
A number of low-cost microirrigation technologies are particularly suitable for irrigating small plots, especially where water is scarce. One of these is bucket irrigation: two
20-litre buckets are hung about 2 m above the ground and, with the aid of gravity, two drip lines or tubes supply water to the garden. Such a system can irrigate a 25- m² kitchen garden with two 20-litre buckets of water per day.
The treadle pump is another very effective and low-cost small-scale irrigation system suitable for groups of home garden managers. The treadle pump is a simply operated device powered with two wooden foot treadles. It uses a PVC, bamboo or flexible pipe as suction/tubewell to pump water. It is useful for lifting water from shallow depths from sources such as ponds, lakes, canals or catchment basins. The treadle pump is easy to install and operate and ideal for dry-season vegetable cultivation or for crops that require irrigation (e.g. oil-palm). However, training is required to ensure that treadle pumps are maintained properly to avoid breakdowns.
If water is applied to the surface of the soil, care must be taken to prevent salinity. Salinity occurs when crops are irrigated with little water in hot weather. The water evaporates immediately and in the process brings mineral salts to the soil's surface. If this condition goes unchecked, plant growth will be inhibited, or even prevented. To minimize evaporation, plants should be watered towards evening. Without water, no plant growth can take place.
FIGURE 6
Watering vegetables with bucket irrigation
USING WATER EFFECTIVELY IN A DRY CLIMATE OR DRY SEASON
Water must be used economically in dry areas. To do this, the home garden manager should:
Above the soil's surface
The use of organic material and mulch can extend the length of the growing season for annual crops by keeping the soil's surface cool and preventing evaporation. Home garden managers should:
Below the soil's surface
Organic matter in the soil soaks up and holds moisture. Home garden managers should incorporate compost or organic material in the soil. One large sack of composted organic matter should be sufficient for an area of about 10 m2. Depending on the organic matter status of the soil, a second sack could be used at the start of the dry season.