HOME GARDEN TECHNOLOGY LEAFLET 16
PLANT PROPAGATION AND
NURSERY TECHNIQUES
A nursery in the home garden can be used to grow seedlings for all areas of the family farm. When a nursery is located within the home garden and close to the homestead and a source of water, seedlings and cuttings can receive regular watering and protection from pests and diseases. For some plants, transplanted seedlings are more likely to survive in the field than are those grown from directly sown seed. A nursery should always be well fenced to keep animals out.
PLANT PROPAGATION
Plants can be raised from seeds (e.g. tomato, cowpea, beans) or from parts of roots, tubers, bulbs, upper branches or stems. These different parts of a plant are known as planting materials. Cassava, sweet potato, yam and other crops are planted using planting materials.
Plants raised from seeds can differ somewhat from the mother plant. Plants grown from planting materials, however, have all the characteristics of the mother plant, except for changes caused by variations in growing conditions.
Sowing seeds
Some seeds can be sown directly into the permanent beds, while others are sown in nursery beds and the seedlings transplanted to the permanent location. Larger seeds, such as those for beans and pumpkin, are planted directly in the garden. Small seeds, such as those for tomato, amaranth, kale and rape, should be germinated in seed beds and later transplanted in the garden bed. Extremely large seeds, such as those for beans, groundnut and maize, must be planted in a shallow planting hole. Bulbs, tubers, corms (underground stems) and cuttings can be planted directly in their permanent location. The seeds of fruit- and nut-trees should be raised in seed beds or containers and transplanted later.
To prepare the soil for planting, mix the nursery soil with compost. The compost used in a nursery must be sterilized as described in Home Garden Technology Leaflet 6, "Special techniques for improving soil and water management". The amount of compost added depends on the fertility of the home garden soil. If the soil is extremely poor, add one part compost to one part soil.
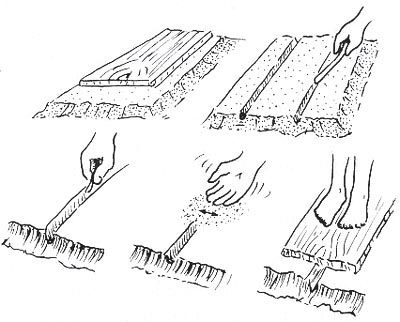
The seed bed's soil should be fine, with all sticks and stones removed. It should be raised about 15 cm above the surrounding area. Mix some sand into the soil to improve drainage and avoid fungus. Press the soil down firmly with a flat board, and then make shallow furrows in it. Sow the seed into the furrows, and then lightly cover the seed with soil. As a general rule, seeds should be sown at a depth not greater than their size. Make the soil firm by placing the board on the soil again and standing on it. Finally, spread a thin layer of mulch on the soil, and water the seed bed (see Figure 2).
Both types of seedlings (i.e. those sown directly in the garden and those raised in nursery beds and later transplanted) should be selected, the unhealthy ones should be removed during seedling development or at the time of transplanting. This selection can take place as part of the thinning process. The healthy plants that remain should be spaced in a manner that will produce the best yield.
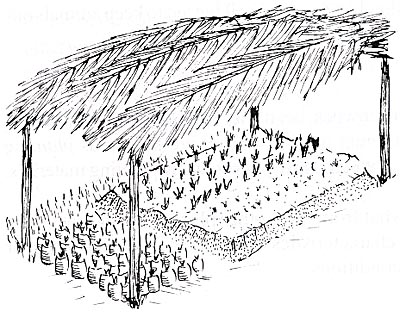
FIGURE 1
A seed bed with cover for shade

FIGURE 2
Sowing seed

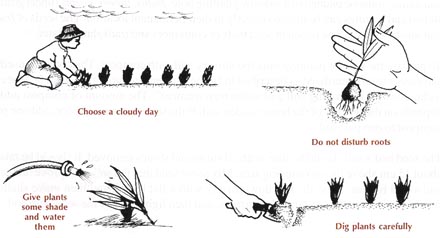
FIGURE 3
Transplanting vegetable seedlings

Light shade provided by the branches of palms or other suitable local material can protect seedlings from too much sun and help keep birds and animals away (see Figure 1). Pools of stagnant water must be avoided so, when watering seedlings, do not pour the water directly on to them but instead gently sprinkle it using a bunch of grass or disperse it from a perforated container, such as a calabash or a tin can.
Raising seedlings in containers
Seedlings also may be raised in containers made from banana leaves, bamboo or any other basket material, as well as in polyethylene bags (e.g. oil-palm). Later, the seedlings can be removed the containers as units, if necessary to protect them from heavy rain or sun, or for other environmental reasons. Such seedlings are easy to transport if they are to be transplanted in a distant location.
To prepare a planting container, mix the soil with compost or a little fertilizer before putting it into the container. Make sure that the container is big enough for the plant's roots to grow without becoming cramped. A plant will transplant better if its roots have been allowed to grow long and deep.
Transplanting seedlings
During transplanting, the roots of a plant should be disturbed as little as possible. Plants with bent or distorted roots should be discarded. Use a stick to lift up the seedlings, and take as much soil as possible with them during the transplant. The planting hole should be deep enough to accommodate the plant's roots. Long tap roots are sometimes cut, but they should not be bent or twisted (see Figure 3).
VEGETATIVE PROPAGATION
Cuttings
Cuttings are the most common form of vegetative propagation. Cuttings can come from roots, stems or leaves, as well as from suckers and shoots. Cuttings are pieces of stem, vines or branches of plants with several buds. The part of a plant from which a cutting is taken and its hardiness depend on the type of plant. For example, cuttings for the propagation of sweet potato must be still green and fairly tender, whereas cuttings for cassava must be mature. Cuttings of trees are usually woody (see Figures 4 and 5).
Cuttings should be taken from the best plants and should be kept in the nursery until new roots or shoots form (two to four weeks). Use a sharp knife to make the cuttings. Cuttings always need sandy soil for good drainage, but they must be watered regularly to avoid drying out. Plant them in a seed bed.
FIGURE 4
|
FIGURE 5
|
Bulbs and tubers
Bulbs and tubers are other forms of planting material. Examples of food crops propagated using bulbs and tubers are yam, taro, shallot, sweet potato and various local minor food crops.
The part of a plant best used for propagation varies and depends on the species and the circumstances. Unlike cuttings, quite often the edible portions of bulbs and tubers are used as planting material.
Availability of planting material
Every so often there is no choice other than to use vegetative planting materials for propagating crops that, over time, have lost their capacity to produce seed (e.g. sweet potato, yam, taro). The storage life of vegetative planting materials, however, is often a problem for seasonal crops. The home garden manager must find ways of ensuring that planting materials are available when required. Inventive farmers and researchers have found solutions to this problem that can be useful to home garden managers. Two of these solutions are the mini-set propagation of yam and onion sets.
Mini-set propagation of yam. Plant tubers with about three to five germination points (eyes) closely together in a seed bed. When they have produced shoots and roots, carefully separate the small, new plants from the mother tubers by cutting off a portion of the tuber to which each is attached. Treat the cut surface with wood ash to avoid damage by bacteria or fungi, and then plant the new plants in their permanent location. This method was developed in Nigeria and has been successfully used by farmers in many other parts of Africa.
Onion sets. If onion seed is not available, cut an onion bulb in half horizontally. The household can consume the top part of the original bulb and use the bottom part as planting material. To avoid attack by bacteria or fungi, treat the cut part with wood ash. This planting material should be planted together in a seed bed. If not planted immediately, the planting material can also be kept for a few days in a cool place before planting. The planted bulbs will produce a number of small onion sets, which can be separated and planted as seedlings. Such seedlings remain attached to the mother bulb longer if there is a water shortage or if the onset of the rains is delayed. This method has been used in the north of Ghana and in Ethiopia.
PROPAGATION OF TREES AND SHRUBS
Trees and shrubs can be propagated from vegetative material and from seed. Seeds should be used only when mature. Some seeds will require special treatment in order to germinate. New tree crops or shrubs also can be produced by using cuttings or suckers, and by air layering, arching and many other techniques. Local agricultural extension workers can provide advice to home garden managers on the trees and shrubs that are suitable for propagation in a given area.
Cuttings
Cuttings can be made from roots or hardwood or softwood shoots. The cuttings are planted closely together in beds of moist sand. When roots and shoots develop from the nodes, and new plants develop, the plants are then transplanted. Fruit-trees that rarely produce seeds (e.g. breadfruit) are propagated in this manner.
Air layering
In air layering, root formation is induced by slightly injuring a shoot that is still attached to the mother plant. To use this form of plant propagation, choose an active growing branch with good buds. Remove a strip of bark near the buds. Cover this "injured" part with some moist material such as moss or cotton. Close up the area with transparent plastic wrap. When roots develop, cut off the branch and plant the new plant, preferably in a container made from banana leaves or other basket material. Plants such as cashew nut can be propagated in this way.
Arching
With this technique, the branches of fruit-trees or shrubs with desirable characteristics are bent down to the ground, fixed with pegs and partly covered with soil. Roots will develop on the covered buds. After the branch is separated from the mother plant, a new plant develops. Cashew nut is often propagated in in this way.
Suckers
Plants such as pineapple, banana and plantain are propagated by using the suckers the plants produce. The suckers are removed from the mother plant and left to dry for about two days before planting. Yields from young plants produced in this way can sometimes exceed the needs of a single farmer, and their surplus can be sold.
Grafting
Fruit- and nut-trees are often propagated commercially with a combination of seed and vegetative material. Sow the seed to produce a healthy rootstock and use the vegetative material to get the desired cultivar. The vegetative material can then be superimposed on the rootstock in a process known as grafting. The plants that are produced with this technique have a vigorous rootstock, produce larger, sweeter fruits and are more heat tolerant.
Healthy mother plants are absolutely essential for grafting. Expert inspection, control and advice are desirable. Such improved plants demand more care and inputs initially but ultimately provide good returns. Few home garden managers have the specialized training and skills this operation requires. A home garden manager with this knowledge, however, could use it to produce planting material not only for his or her own farm but also for the whole community. Substantial income also can be derived from the use of this technique.